
I last posted about my dive into the world of ATCs (Artist Trading Cards) and how much fun they have been to make. I left you guys hanging with a teaser of the cards I made for the Good Things Together ATC swap, but now the wait is over!
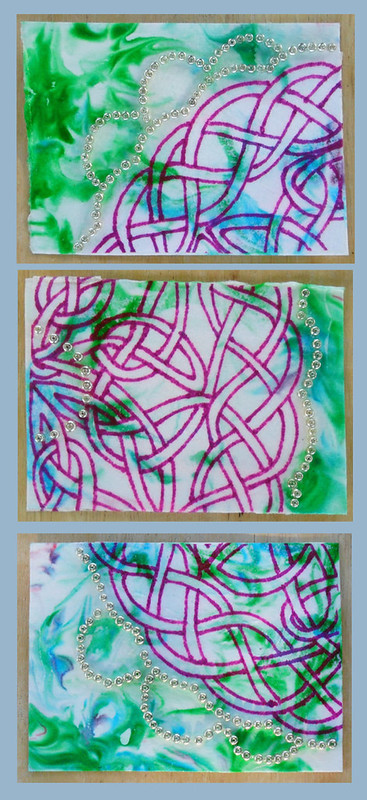
BEHOLD! My "Celtic Curiosities" ATC set!

They were incredibly fun to make with a few surprise techniques--you know, those great things that are supposed to go one way but go another to work out even better (most of the time). I created these in a three step process:
- Print the backgrounds
- Draw and transfer the Celtic Knot-work
- Glue down the beads
The inspiration for this series actually came from a tutorial I found for the background technique--I knew the second I saw it that I HAD to try it. Like, it would physically hurt if I didn't do this technique. This is where I found the tutorial. It's on a blog called "Tot School" which is an AMAZING source of creativity!!! I honestly can't read it very often because I get lost and forget I have other obligations like work, or laundry,... or kids...
Basically the tutorial instructs you to use shaving cream as a dye base in a cookie sheet or large pan, and swirl in drops of washable watercolor or food coloring. Once you are pleased with your design, you press your whole paper down, remove, and scrape the shaving cream off. Voila! You have a large sheet of great marbled paper that dries very quickly!

Since this site is obviously geared towards kids, I felt pretty safe doing a "revised" version of the tutorial. I skipped all those pesky space and easy clean-up concerns since I'm all grown up and know how to contain a mess. *cough*
The first change I made was to use my precut cards instead of one large sheet of paper. (See, no space concerns!) Only catch is that it leaves no part of the paper to pick up that hasn't been smooshed into the shaving cream. Not a big deal until you come to revision number two where I "passed" on the washable water colors and went for the food coloring. On the bright side, my fingers were very lovely shades for several days!!! When I do this again, I will take the advice given and use large sheets and a large cookie sheet instead of my little Pyrex bowl.
But I love the results!!!

Once the marbling was done, my next step was to draw up the Celtic Knot-work. I spent a month or so late last winter determined to learn this technique. I'm still not perfect, but I think I do a respectable job! The swirls and graceful flow of the paper background reminded me of the flowing Celtic art I had spent so much time with, so I felt this was the perfect opportunity to revisit my lessons.
Since I discovered the transparent tendencies of white tissue paper mixed with Mod Podge earlier in my ATC adventures, I decided to use this to my advantage now. I worked out my knots and lines on a plain sheet of paper. Once I was happy with their final appearance, I traced over this sheet onto white tissue paper with a rich purple color. *Before taking this step I tested three different writing utensils with the Mod Podge, and paper to make sure they didn't bleed. two of the three did!!!

Now that I had my transparent Celtic design, I cut it into the appropriate sized pieces and Mod Podged them onto the cards-- underneath and on top. I was going to stop here, but I was not happy with the final cards. I felt they were missing something. I wanted a little sparkle that could be part of the design without taking away from the overall feeling of the artwork. I happened to have a ton of silver-tone seed beads, so I felt these would be the perfect shape and size to add a complementary scallop design.
I had this great idea to thread them all onto a string and then easily lay the string down into the line of glue I carefully put onto the card in just the right shape with perfect placement. Guess what?! Didn't work. I think I sorta cried a little and maybe even had a little pity party when I came to this conclusion. I knew I wouldn't have time to individually glue every single bead down and the deadline to post photos was fast approaching.
The solution came to me when I accidentally dropped beads where they weren't supposed to be. I couldn't pick them up, so I gently scooched them into place. This seemed to work fairly well! So I started dropping about 8-10 beads onto the card at a time and pushed them into place. After doing this with every card, I went back to the beginning and absolutely covered the beads in Mod Podge-- I mean, I slathered it on Hot Fudge Sundae style! It was so thick and white when I finished that I was very worried it would not dry clear. (I'm sorry I didn't get a photo of this because it really was a site!) But luckily it dried perfect with what seems to be a very secure bond, so I am very happy with the process.
So when all is said and done, I now have six ATCs ready for my group swap! After seeing some cards from previous swaps, I am very excited to start collecting my own! They are unique little treasures that showcase each artist's heart and soul. I hope that mine are appreciated and cherished just as much, and that this is just the start of a wonderful new artistic obsession!
Here are a few of the cards I have been drooling over for the last month or so:
|


I can't wait to see what I get from the grab bag of goodies! And then to figure out how I will keep them... I love the idea of a little bedside table photo-frame, or maybe mini frames for the fridge? I can't bear the thought of closing them away in some book somewhere only to be visited occasionally. I will have to research some options! Maybe you will see a post sharing some of my favorite ideas in the near future...!
Your cards are beautiful, I really love celtic knots myself, and this is an awesome tutorial!
ReplyDeleteThank you so much for featureing my cards as well, they were my very first ones so it is a real honour to me that you did!! :)
spookycuddles
Nice variety of ATCs and good write up about your process. Enjoy your blog!
ReplyDelete